As part of work I recently had a chance to participate in a 3 day game-jam. In the past I’ve always steered clear of game jams because the ideas I’m usually interested in building have no way of being realized within the time limits. This time however I decided to give it a shot and decided to build a 3D game in the browser using webGL.
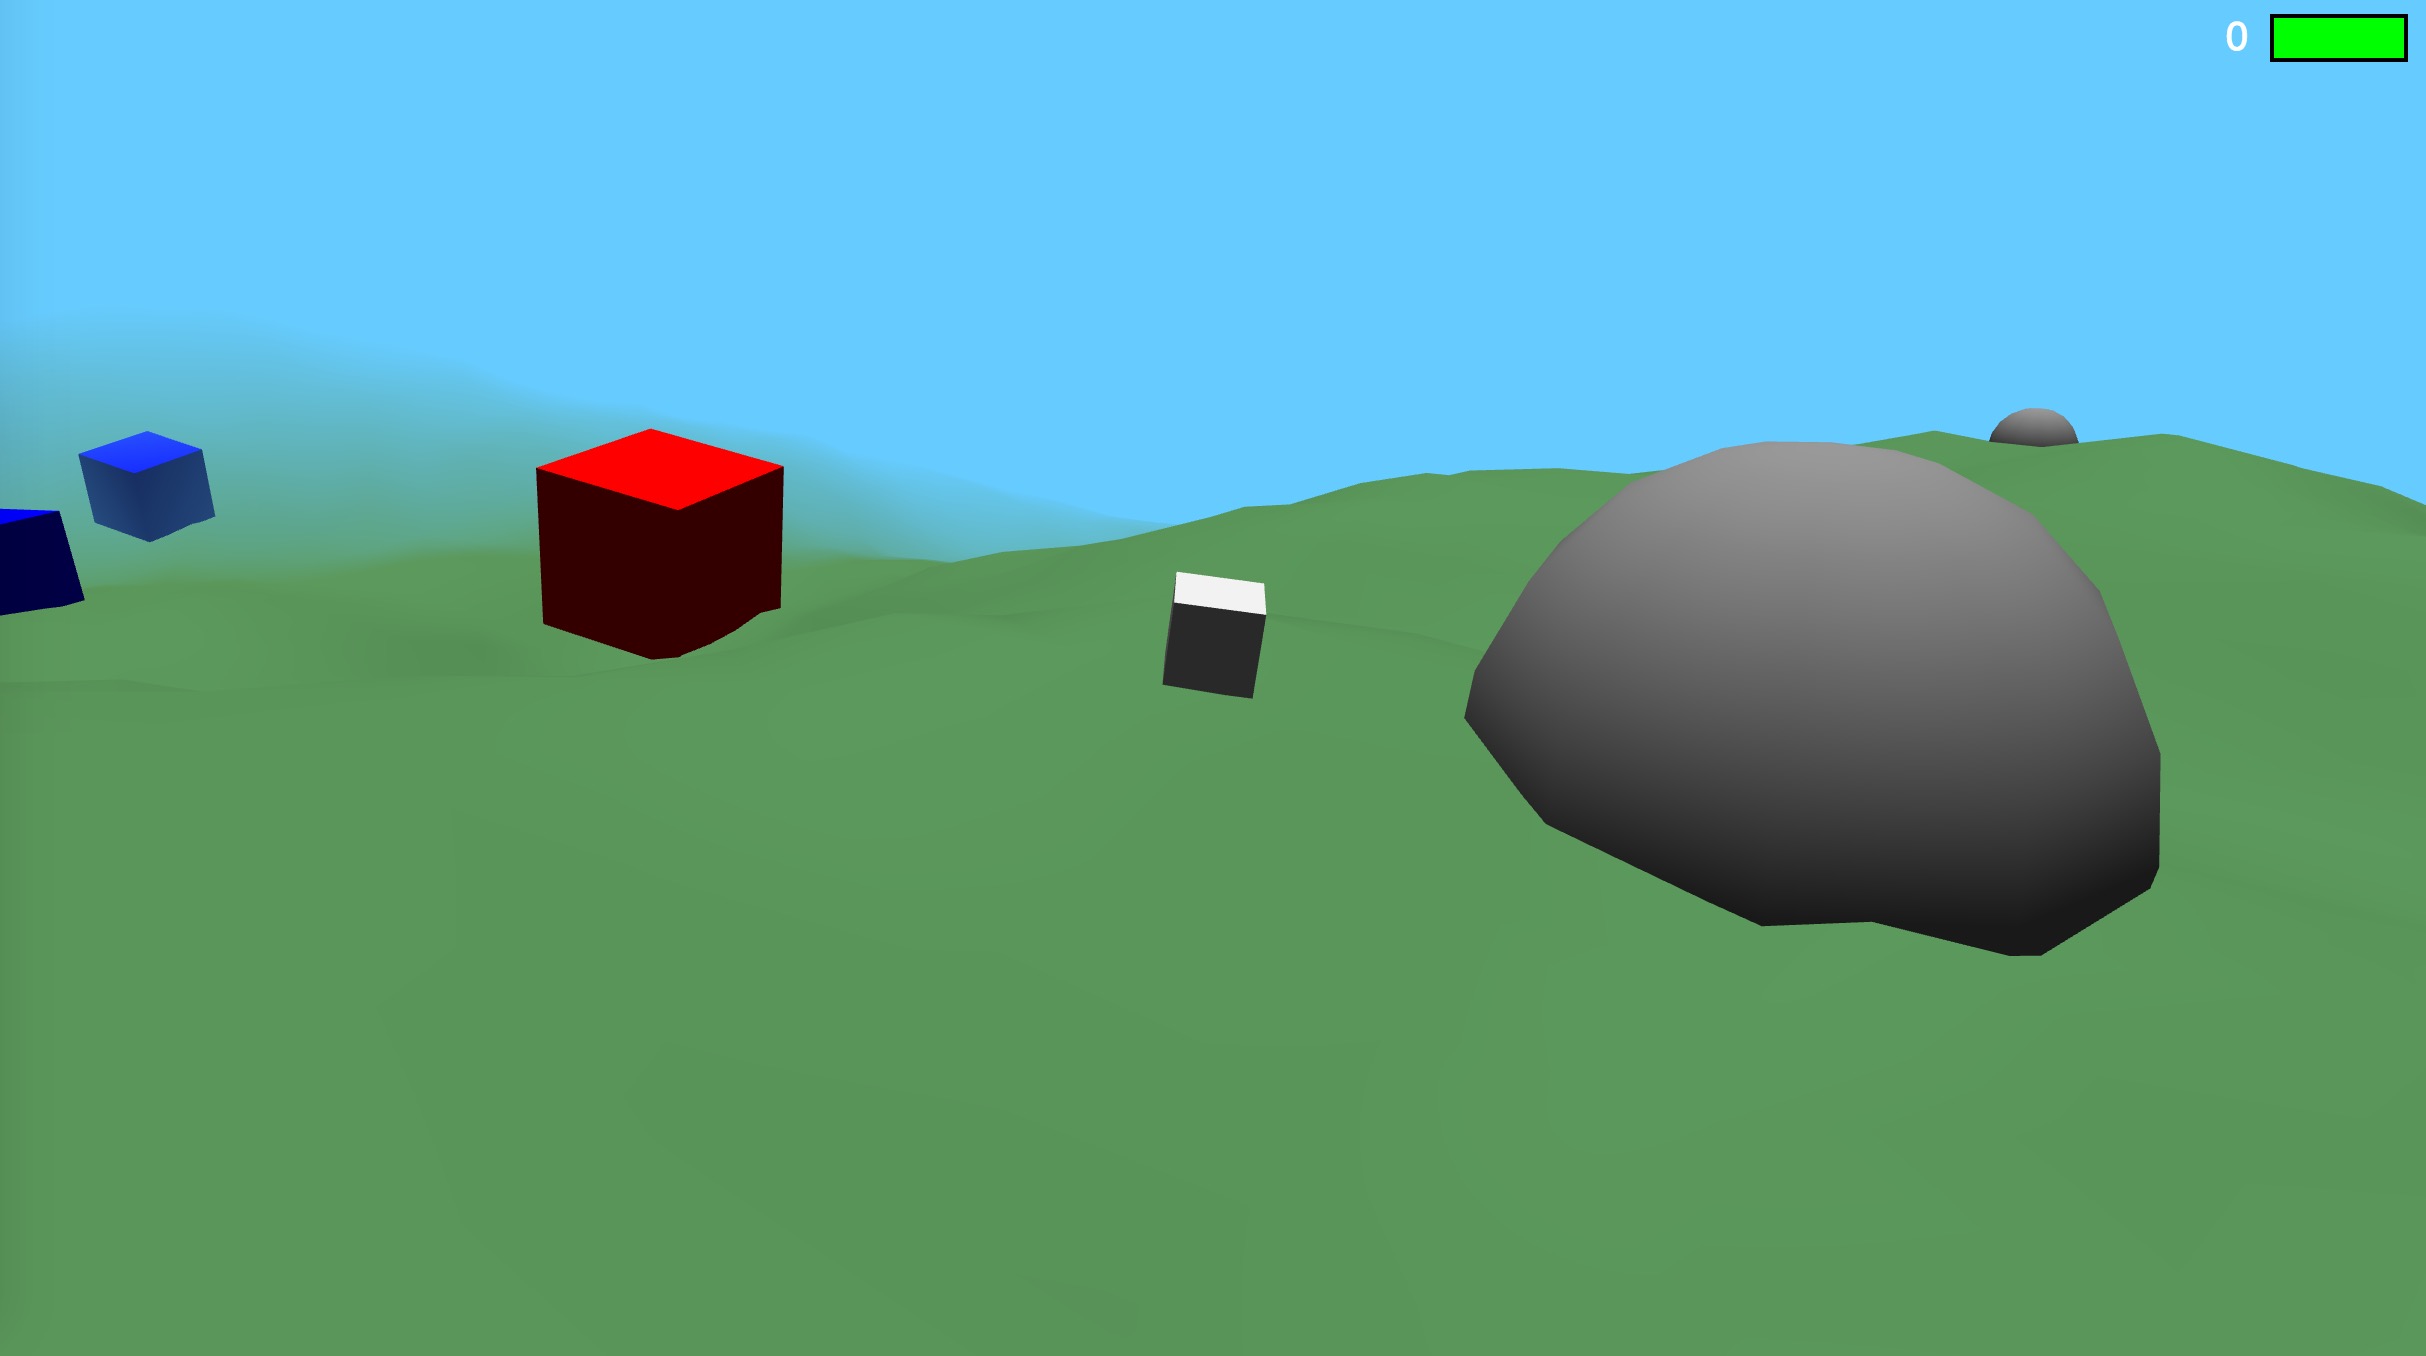
The initial idea revolved around driving a robotic rover that could transition from multi-legged movement into a crazy monowheel (inspired by a desert spider that does backflips to evade predators).
I didn’t really have many gameplay ideas in mind other than trying to make it a fun and satisfying experience to just cruise around and get used to the weird locomotion mechanics. I figured if I got as far as having terrain generation working and a competent third person camera set up by the end of the jam that I would have exceeded my expectations.
With this in mind, I put together a nice WebGL starter framework based on the Component Entity System pattern - the really great thing about this pattern is that it completely separates state from logic - meaning that with the help of Webpack, one can implement hot reloading of all game logic while the game is running (without resetting the current game state). This is really cool and makes it easy to iterate on systems and effectively build the game while it runs. Check out the GitHub repo if you’re interested in finding out more.
Now that you have an idea of what I wanted to build, and how I went about building it - check out what I actually ended up building, subject to the constraints of time. While its not the most fun game in the world, I’m happy with how it turned out and I have a new appreciation for the effort it takes to convey a fun sense of motion through controls, physics, and a camera.
I had so much fun building the game, that I’m considering starting work on the procedural mad-max-meets-kerbal-space-program-on-a-road-trip sim I’ve been thinking about for a while. I think it would be really cool to build a fully fledged game in the browser, with all the inherent advantages in rapid development that javascript & the browser offer, combined with all the performance problems that come with it that need to be overcome.
While I’ve always been interested in electronics, I mainly got into software because software affords the flexibility to make mistakes. The cost of failure is low and there is room for experimentation without the risk of wrecking anything expensive (most of the time). While this is great, I always get the gnawing feeling that somehow the things I build are less real, or least less understood than building physical objects. At the very least, hacking away on a keyboard is much less romantic than hammering & soldering in a workshop with some high voltage apparatus. So for someone like myself, the appearance of low cost general purpose computers such as the Raspberry Pi has been really exciting. It lowers that cost of failure in electronics and allows a pathway for bringing things I build into the physical world.
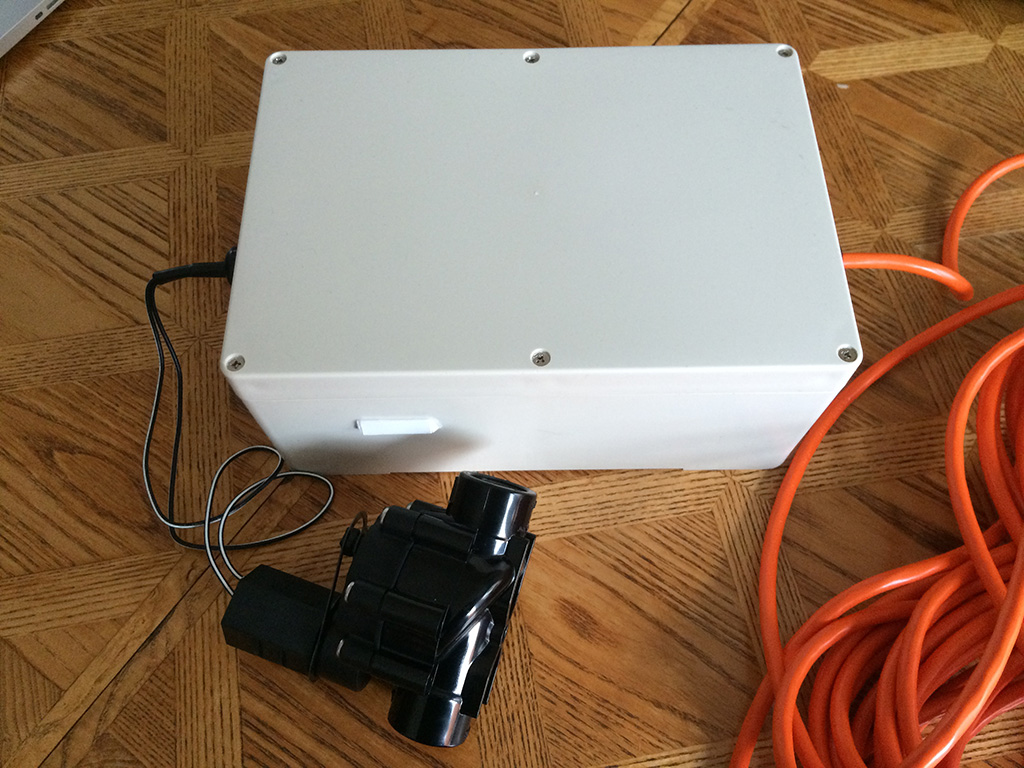
The thought of building something that was more than just software has been eating up real estate in the back of my mind for some time now, so I finally decided that I would make my contribution to the Internet of things. As someone who has began dabbling in gardening, and has also had to weather (pardon the pun) high water costs due to Californias drought - I decided to build some sort of intelligent drip irrigation system that would only water when weather conditions required it, saving myself the time of daily watering, and also some water (and $) in the process.
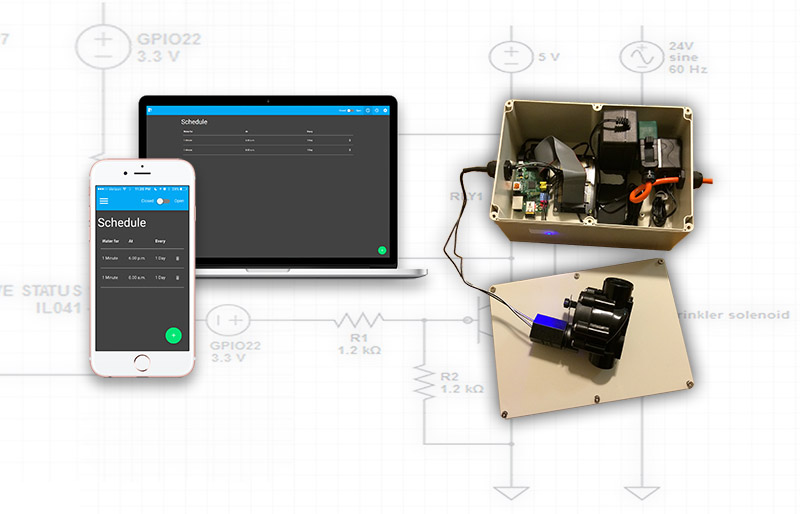
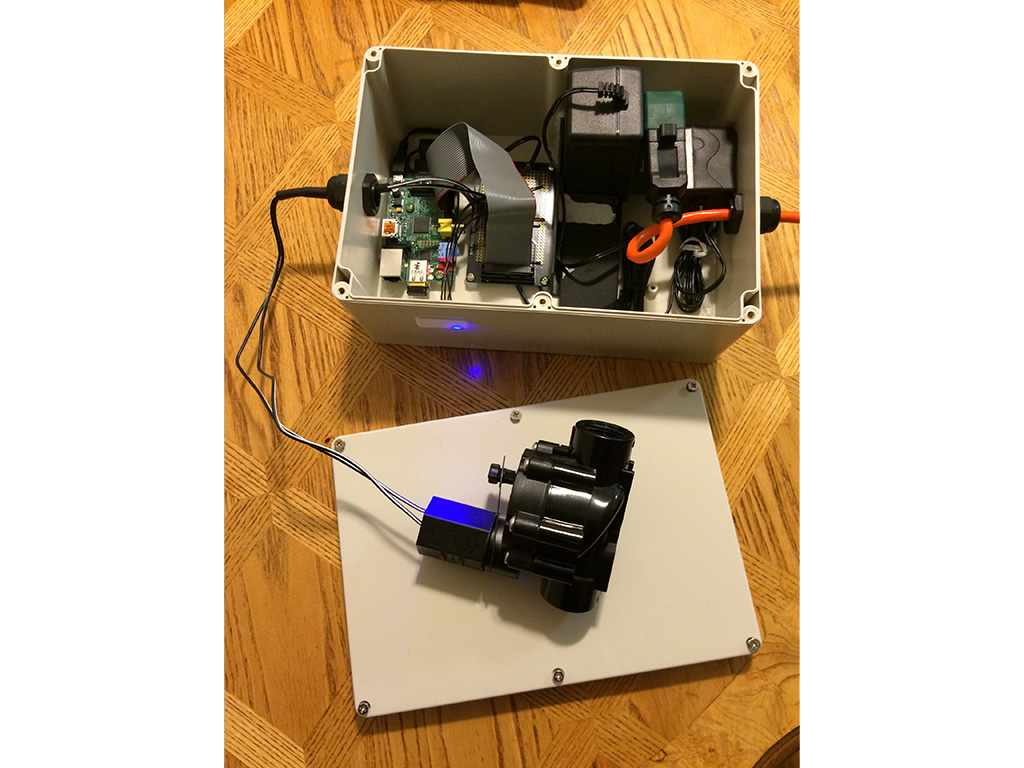
The general design I came up with was to use the Raspberry Pi running a web server, this server would host a web interface and a scheduler and would control a solenoid water valve attached to the Pi. I’d place the completed device in a waterproof enclosure attached to the water supply a set of drip irrigation piping. With this in mind I put together my initial shopping list.
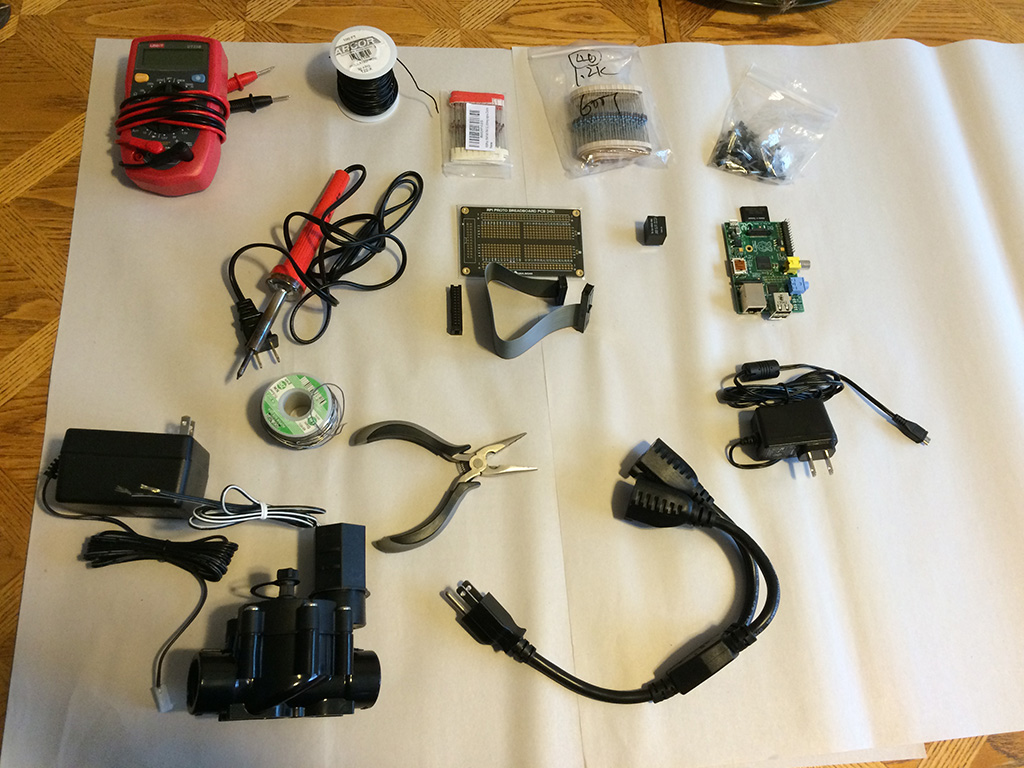
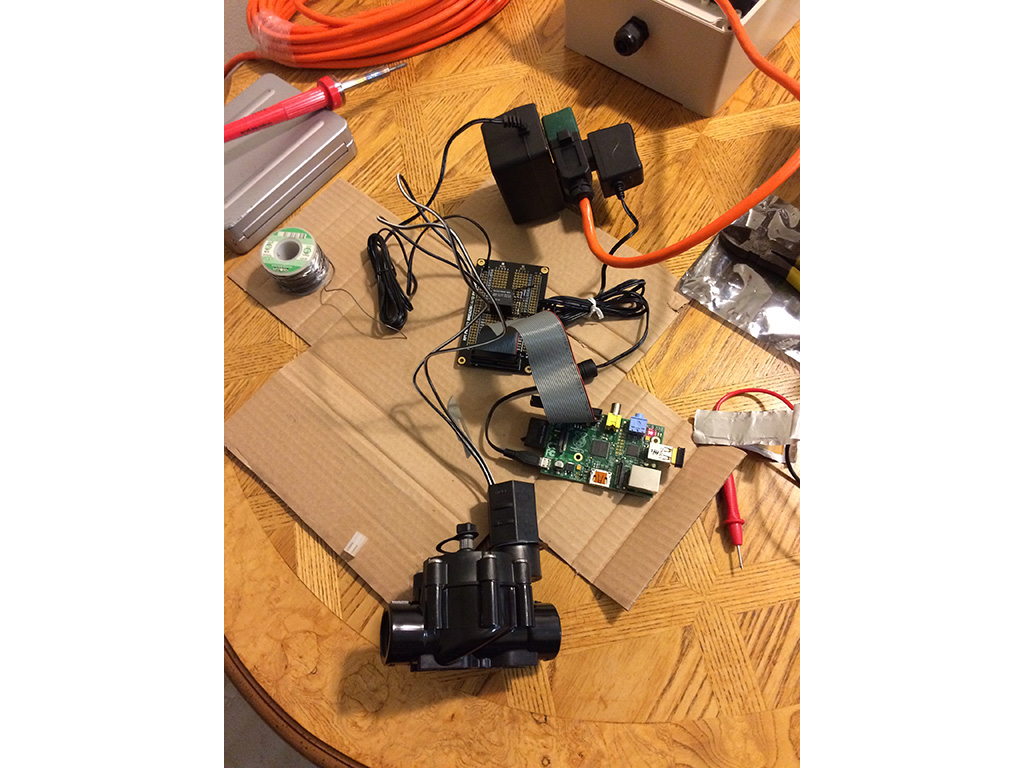
The hardware
Most of the components
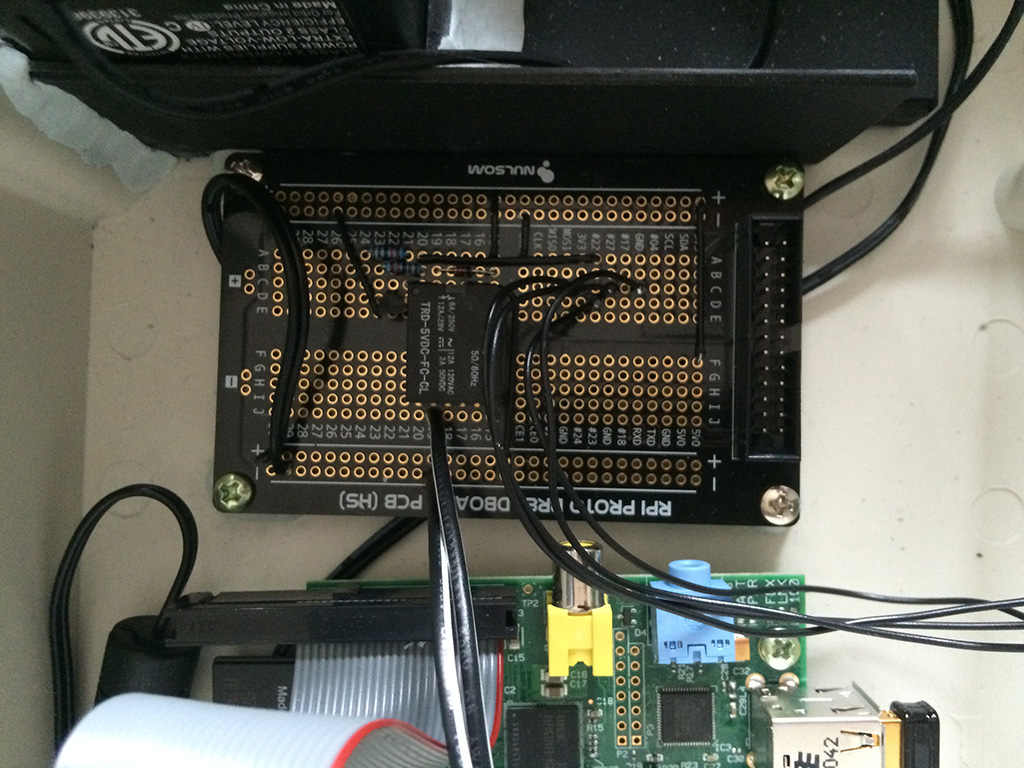
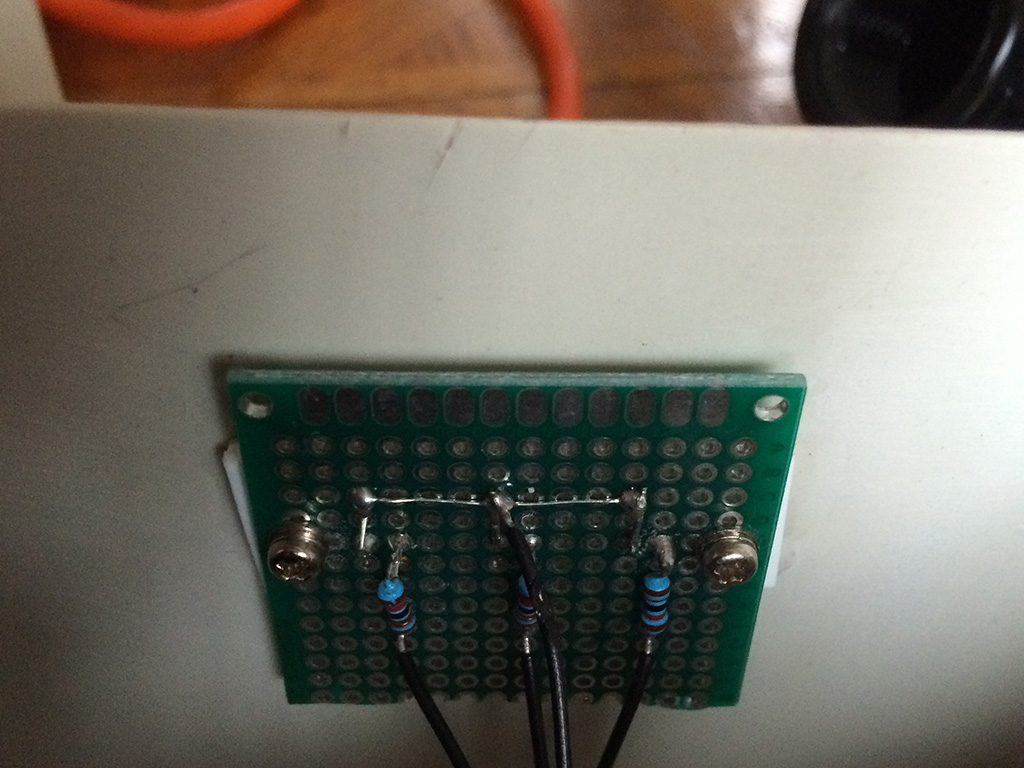
The circuit layed out and soldered onto the protoboard
The test rig used to test the solenoid was activating when the software set the GPIO port values
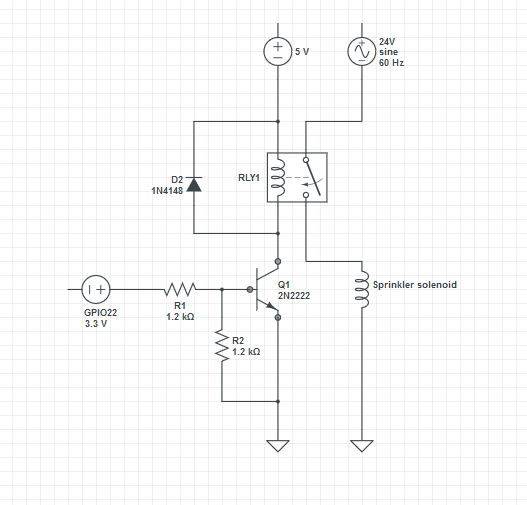
I decided to use a 24V AC relay as it is the most commonly available solenoid valve. This meant that I was going to need to devise some control circuitry as the Raspberry Pi runs at 5.5v and its GPIO ports can only supply 3.3v so I wouldn’t just be able to hook it up directly. The way I did this was to use a relay that would activate when 5v was put across one side, this would be used as a switch to control the 24vac switch. To activate the relay I used a transistor with the base attached to one of the Raspberry Pi’s GPIO ports - the 3.3v is enough to energize the base of the transistor, which would complete the circuit to ground providing the 5v across the relay, letting us switch the solenoid via a single GPIO port being on/off. The circuit diagram for this is shown below.
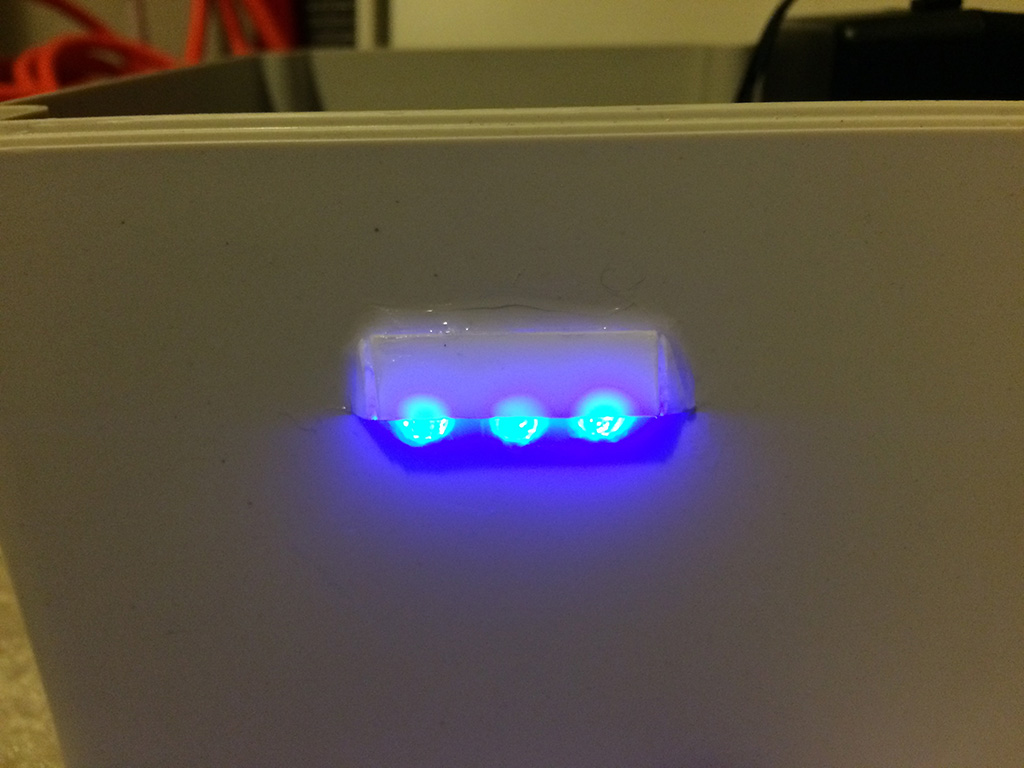
Status LEDs
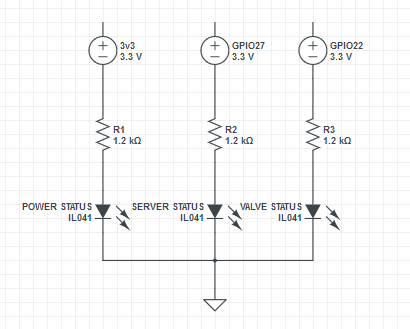
As a last minute addition I noticed that once all the components were sealed away there would be no way of knowing if it was running or what the software was doing, so I decided to add a set of 3 status LED’s. One LED would indicate power, one would indicate that the server software was running, and the 3rd would illuminate when the solenoid switch was activated. The circuit diagram for this is shown below.
Initial testing
To control the GPIO ports I used the onoff library which makes it simple to set the state of any of the Raspberry Pi’s GPIO ports. I wrote the following test script to test my initial circuit. When running it toggles GPIO port 22 once every second, which meant that once I attached the circuit above, I should hear the relay click on and off once per second like a metronome.
Initially nothing worked, I found after some multimeter testing that I had soldered the pin header on backwards so none of the outputs were going where I expected them to. After filing off the notch key on the parallel cable connecting the Pi to the protoboard and plugging it in the other way, everything worked! The relay clicked happily every time I ran my test script. After determining that everything was working, and with the help of some epoxy cement, superglue, silicon sealant, and some old parts from a PC case I got everything attached securely into the plastic enclosure and added waterproof cable glands to the entry points for the power and solenoid cables.
The web UI
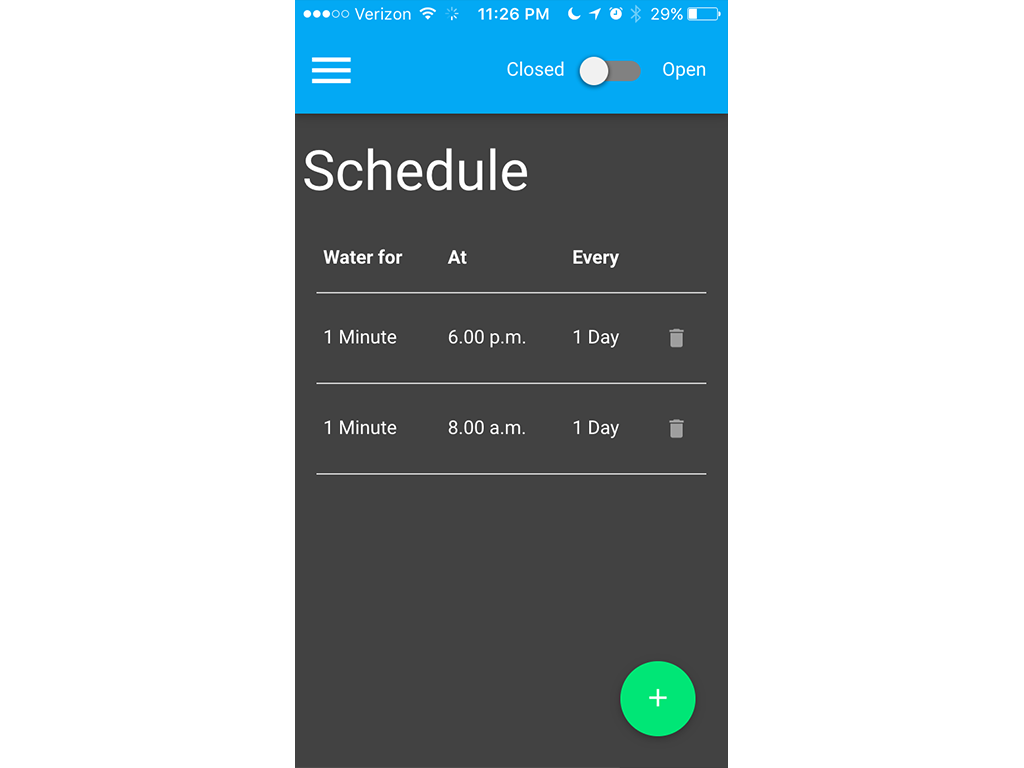
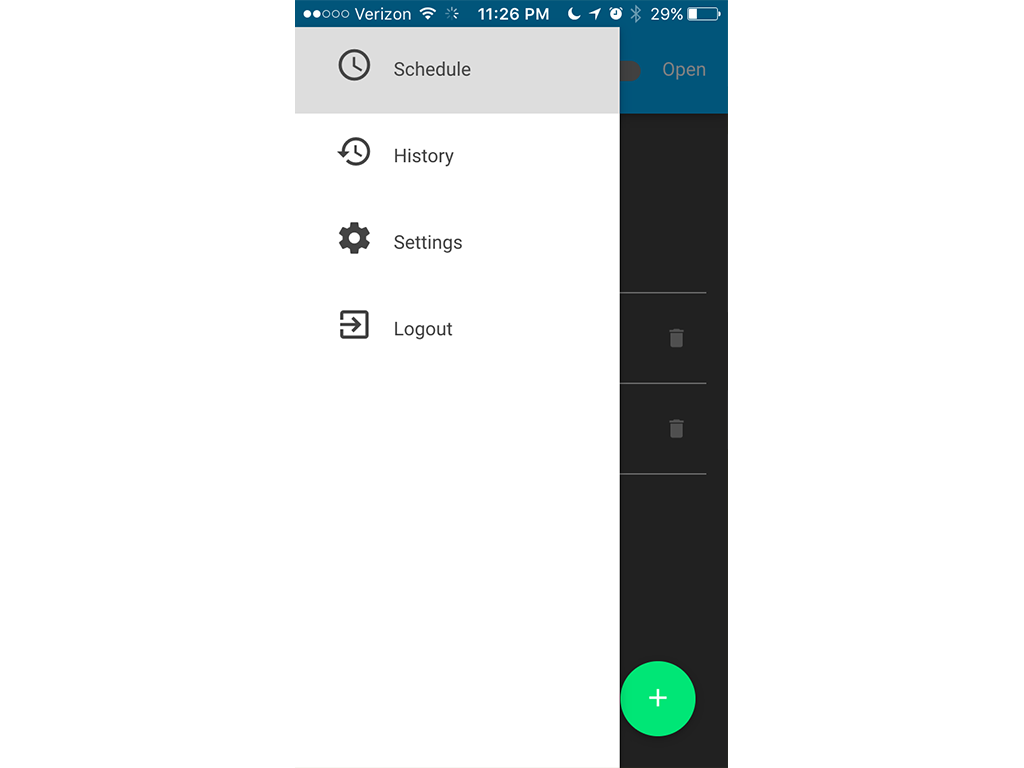
The main schedule screen on an iPhone 5s.
The responsive slideout menu on an iPhone 5s
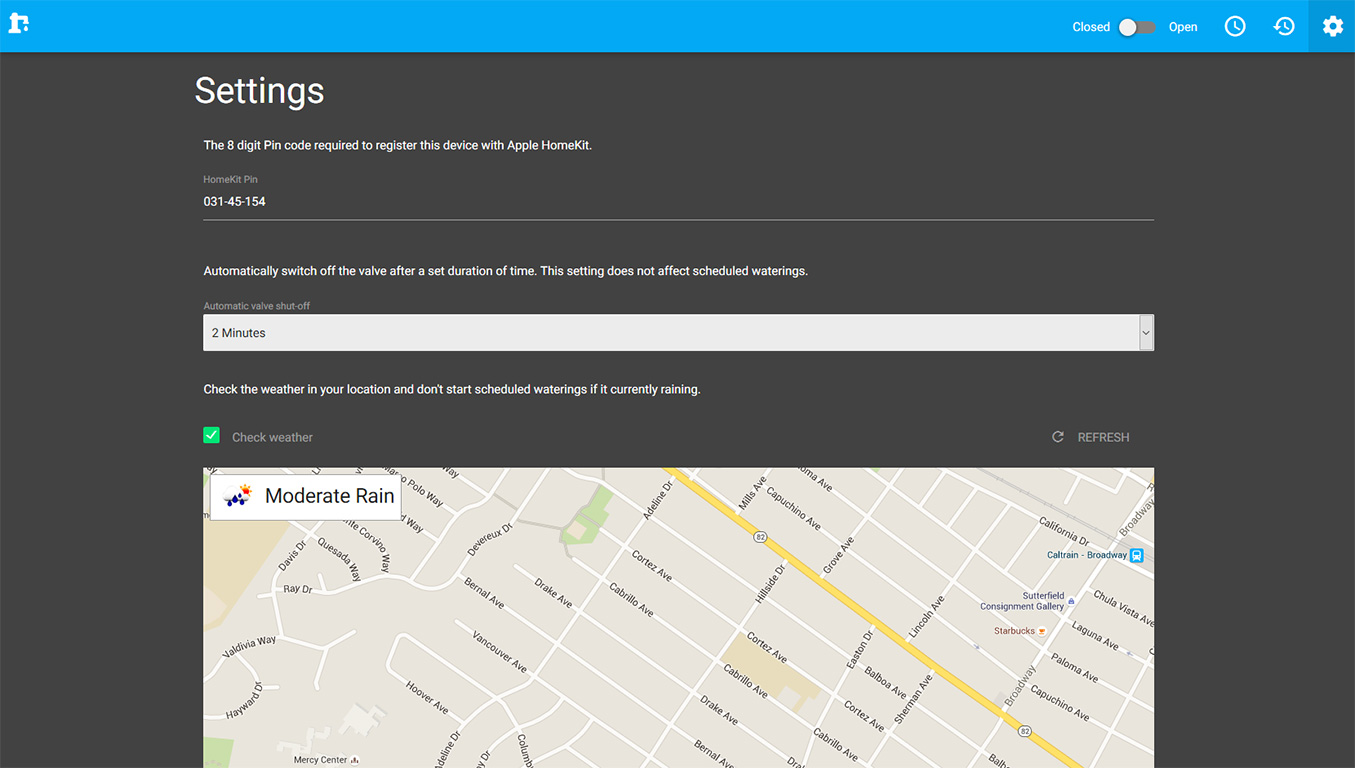
The settings screen on an iPhone 5s
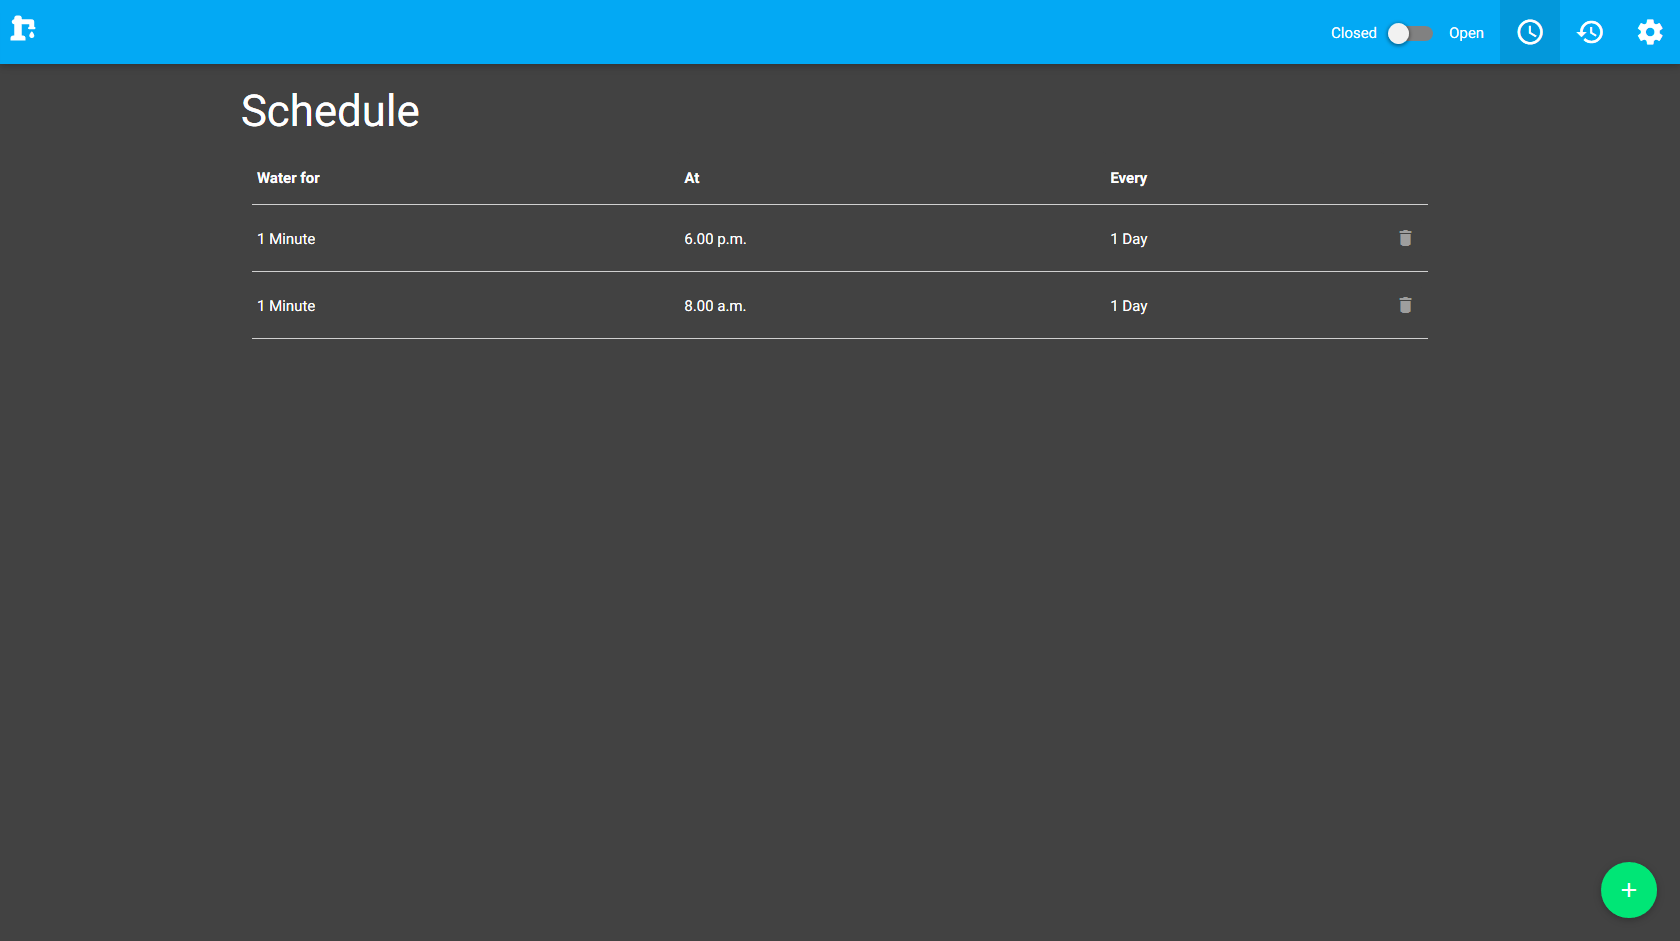
The schedule screen on a desktop browser
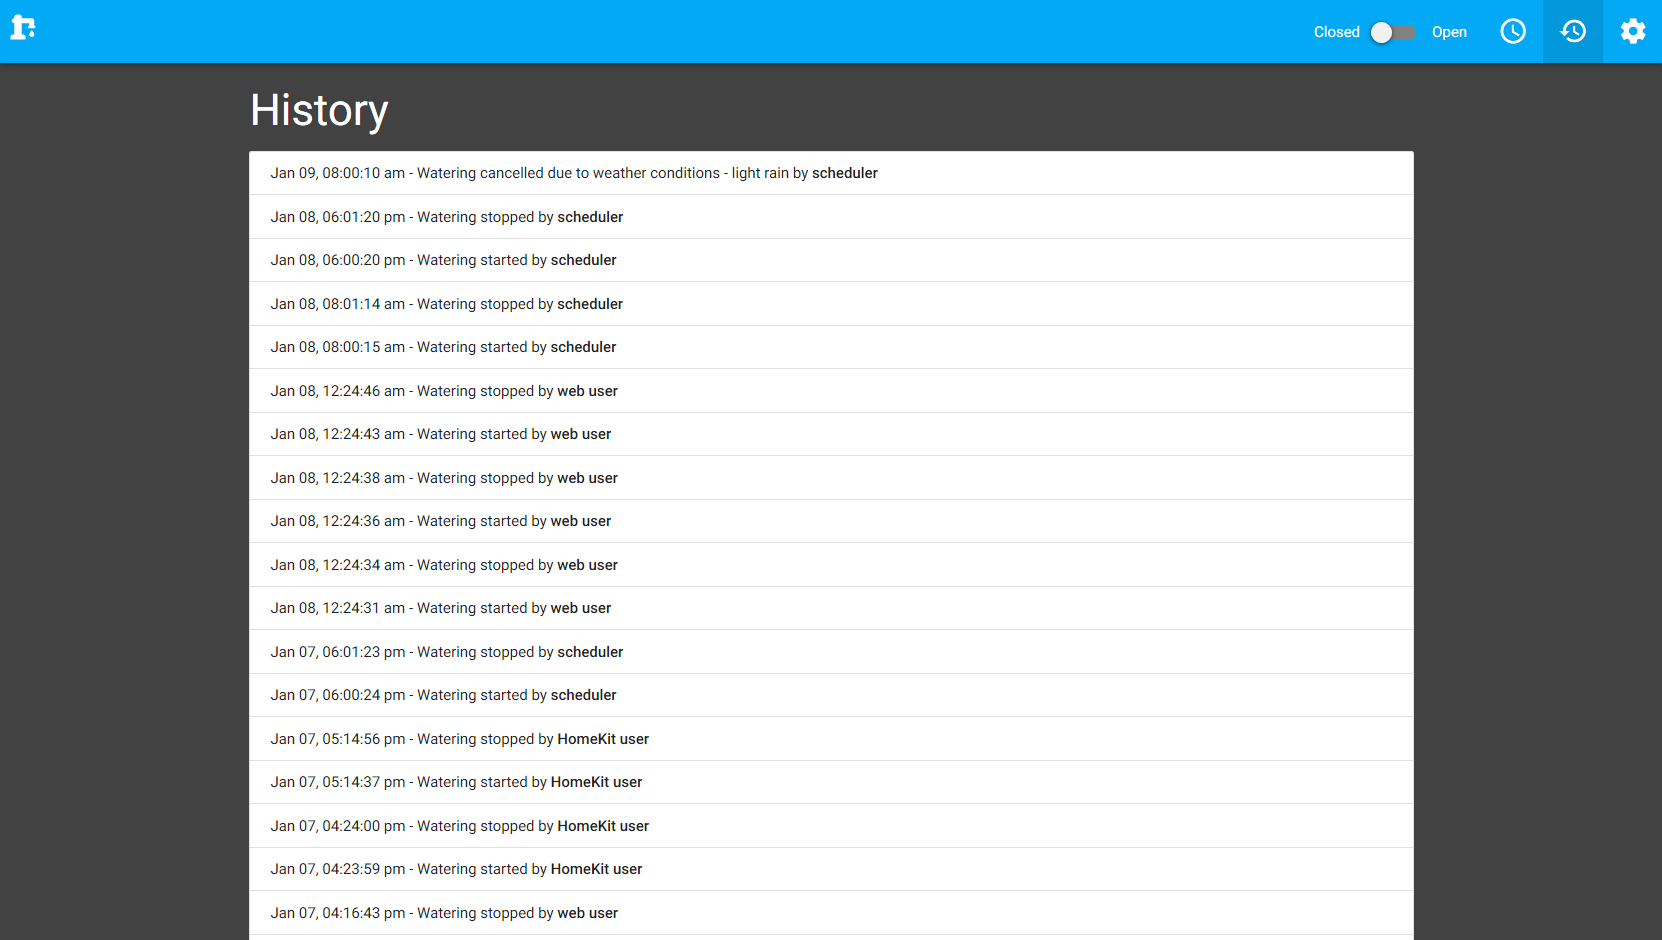
The history screen showing a list of all watering events
As mentioned previously, the idea was to build a server that would run a scheduler and a web UI, so you can set up an automated schedule as well as control the device directly from a PC or smart phone. To put the web UI part of this together I used React.js, Redux, and MaterializeCSS on the front-end, and an Express based http server on the backend. With these together I was able to put together a nice responsive interface in a short amount of time.
The most complex part of the UI was implementing the configuration interface for the weather based intelligent watering (I didn’t want to water the garden if it was already raining). To do this I used the Google maps API along with the HTML5 geolocation API to determine the users current location when they elect to switch on intelligent watering in the settings. With this I could collect the users latitude and longitude coordinates which I could pass into the OpenWeatherMap API to determine the weather in the users area.
In addition to the web UI I implemented a scheduler which wakes up periodically to see if the user scheduled any waterings for the current time and runs the valve for a preset interval, unless of course intelligent watering is enabled, in which case it checks if its already raining and if it is, it doesn’t bother watering.
HomeKit and voice activated control
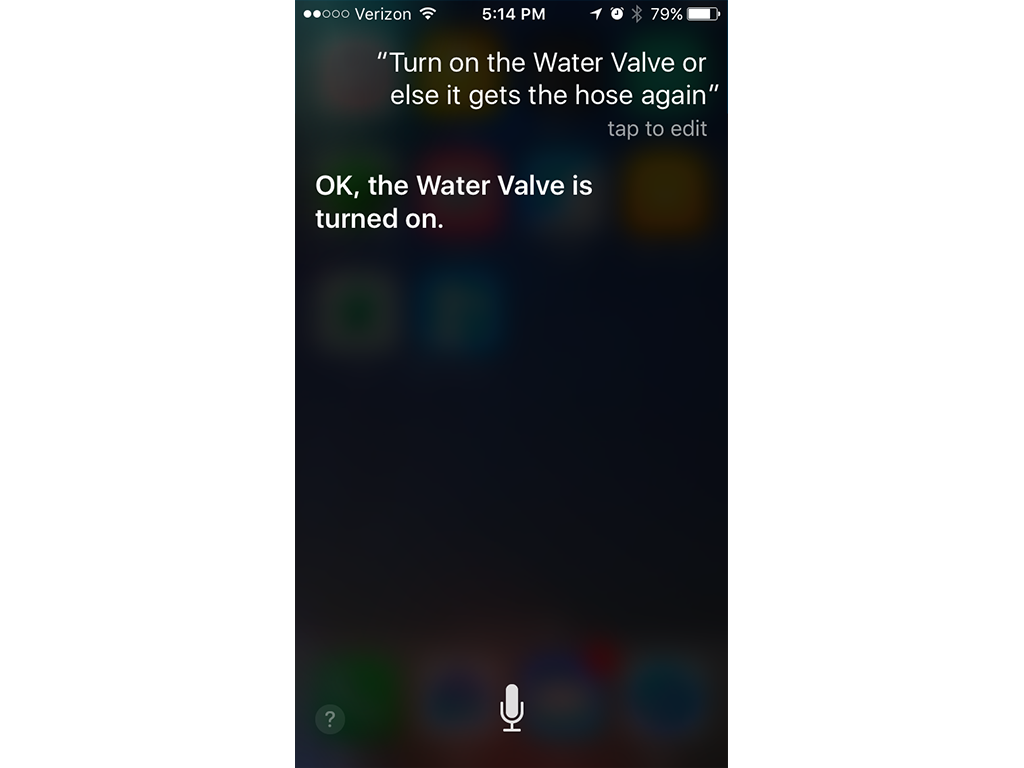
Asking Siri nicely to turn on the water valve
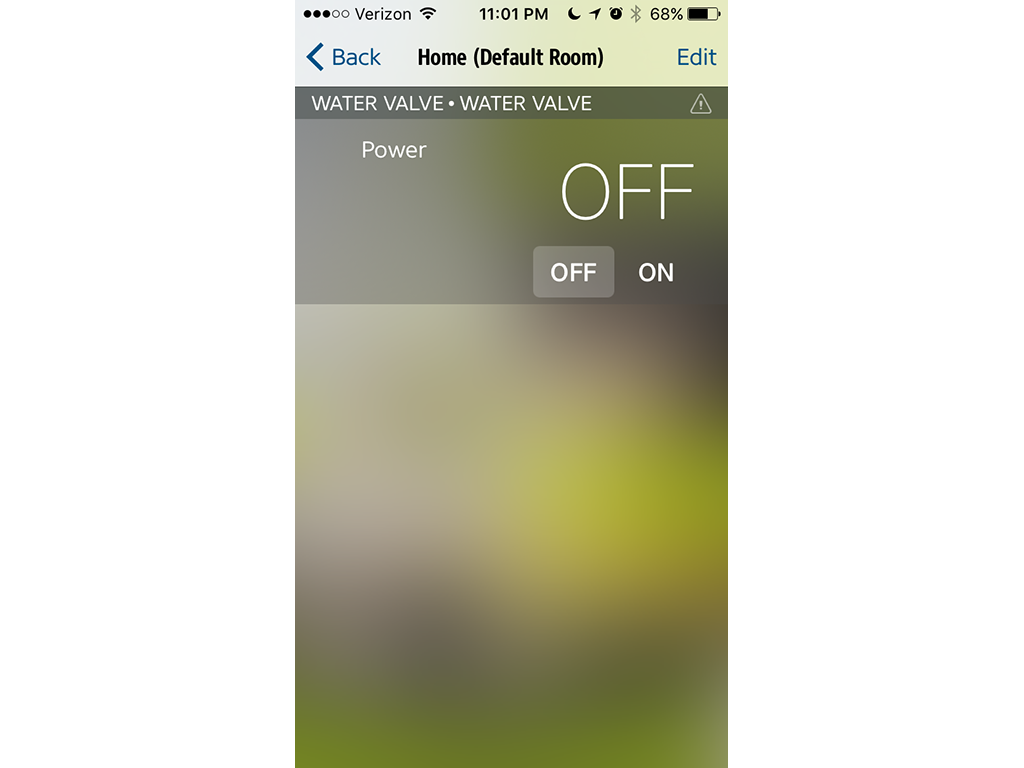
The water valve installed as an accessory into Eve
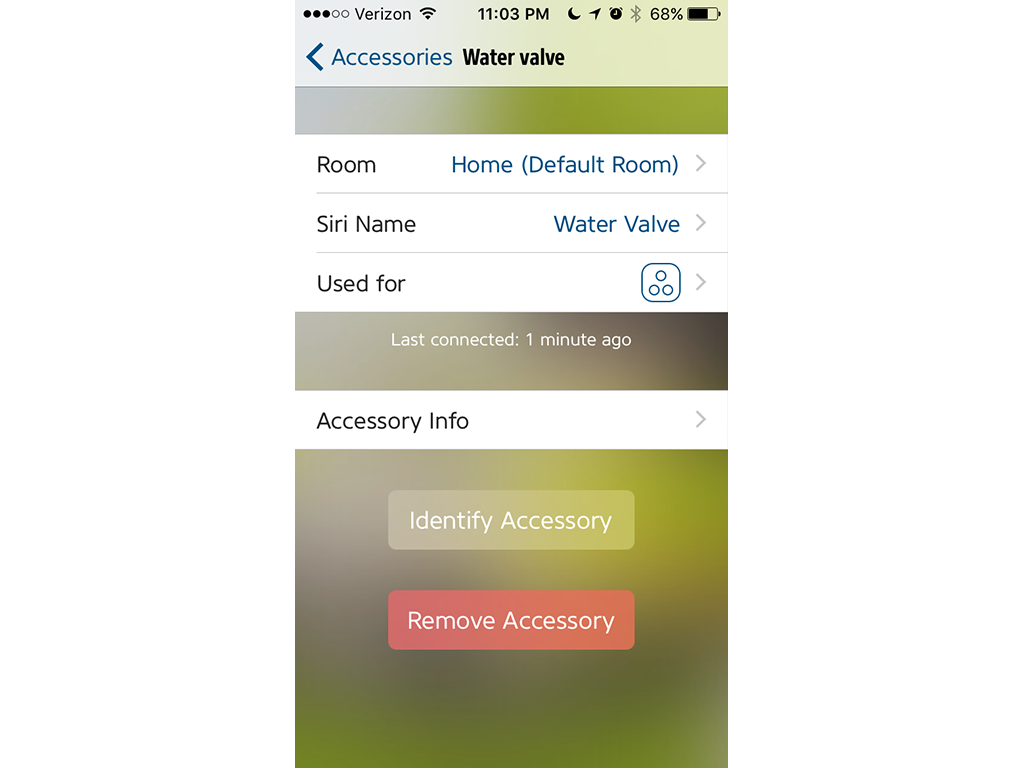
Configuration for the water valve HomeKit accessory
While having an intelligent watering device with a webUI was pretty cool, I wanted to take it to the next level by adding integration with Apples HomeKit, and enable voice activated control via Siri. For this to work I needed to implement a server that implemented the HomeKit accessory protocol. Luckily theres a really good library for Node.js called HAP-NodeJS which makes this a fairly simple process. You need to feed into it some configuration information about your accessory, and provide some callbacks into the HomeKit events such as toggling the power status. The second step is that you need an app to add the accessory to your HomeKit ‘home’ (For some reason Apple don’t provide a built in app to do this), so in order to do this I downloaded the free Elegato Eve app. I can’t really speak to its quality for the more advanced HomeKit features, but its free and it did what I wanted which was to register my accessory with HomeKit, so I could use Siri to control the valve.
Adding the accessory was simple - once I had the Hap-NodeJS server running on the PI, the water valve showed up as an accessory in the Eve app which I then added to my ‘home’. Once I did that I could tell Siri to switch the valve on and off, and it worked!
Lets say you have a library of common react components, and that you’re using this library in some other project. If you have some unit tests in your project which use these library components, things work just fine when your project has installed your component library via npm install - but lets say you want to use a local development copy of your components library and npm link it to your parent project so you can make changes to the library easily. Now when you run your parent projects unit tests, you’ll probably see something nasty like this
Uncaught Error: Invariant Violation: addComponentAsRefTo(...): Only a ReactOwner can have refs. This usually means that you're trying to add a ref to a component that doesn't have an owner (that is, was not created inside of another component's `render` method). Try rendering this component inside of a new top-level component which will hold the ref.
The reason for this is that your components library, and your parent project both have thier own locally installed dependency on react, and when you load the unit tests your library components are using the copy of react from the component library, and your parent project is using its own copy of React. React doesn’t like it when you load multiple instances of it at once, and you’ll see the above error when you do. Usually when installed via npm install, this isn’t a problem as the components library probably declares react as a peerDependency, and would rely on the parent projects copy - but when using a development copy using npm link the component library probably has a copy of react installed locally as a devDependency, leading to duplicate copies of React and the problem described above.
After struggling with this issue, I found a workaround that doesn’t involve changing the library or parent project considerably, so I thought I’d post it here to help anyone who has this issue in future. Include this file before you require or import React and the error will magically go away. The easiest way I’ve found to include this is to have a single file index.js which exports all your libraries components, and in your package.json add the file below as loader.js and set it as the “main” file. This file should then, after patching the loader, require index.js. This way you don’t have to change any of your component code.
constm=require('module');constoriginalLoad=m._load;constpackageConfig=require('../package.json');constpeerDeps=packageConfig.peerDependencies;/**
when other users of this library write tests that use components from this library
we need to ensure that the users copy of peer dependancies are used, and not this
libraries own local copy (React component tests will fail as it doesn't like it
when multiple copies are loaded at once). To fix this we'll do some patching of
the Node module loader
*/if(peerDeps){m._load=function(request,parent,isMain){if(peerDeps[request]){constparents=[];while(parent){parents.push(parent);parent=parent.parent;}// reverse the usual node module resolution. Instead// of trying to load a local copy of the module and // going up until we find one, we will try to resolve // from the top down, this way peerDeps are preferentially // loaded from the parent instead.parent=parents.pop();while(parent){try{returnoriginalLoad(request,parent,isMain);}catch(ex){parent=parents.pop();}}}else{returnoriginalLoad(request,parent,isMain);}}}//Now export the library componentsmodule.exports=require('./index');m._load=originalLoad;
NOTE:
One caveat to note is that if you are building a distribution of your components library using webpack, you’ll have to conditionally exclude this code from running by using a conditional and the webpack DefinePlugin otherwise webpack builds will fail due to not being able to load the ‘module’ module.
Through a complicated and not particularly interesting sequence of events I’ve ended up with a few weeks of (f)unemployment in between my last incredible journey and my next job. Rather than let this opportunity go to waste I’m planning on filling my time with a few projects I’ve been meaning to get around to doing.
Heres project #1 - my attempt at a pixel art rendering of Hong Kong.
I recently decided to shift a bunch of my websites (sharpoblunto.com, junkship.net, matchstickframework.org) over from my ancient home built asp.net based framework to something a bit more reliable and low maintenance. I didn’t really want to put a huge amount of effort in to port the sites over, so that cut out options that would involve learning whole new languages and frameworks. Also after looking over what my requirements were it pretty quickly became apparent that I didn’t really require any dynamic functionality that couldn’t be covered via client side javascript. Because of this it seemed like a static site generator would be the way to go - I already had the front-end html templates from the existing sites, I would just have to adapt them to whatever I chose.
After a quick look around Jekyll emerged as the most suitable solution, helped in part by the fact that one can host Jekyll powered sites for free on GitHub using a custom domain name. Porting over the asp.net MVC view files to Jekyll templates was pretty straightforward (If your curious how it all looks, this sites source is available here on GitHub)
The most time consuming job was transferring the content of my old blog archive database (where all the blog content was stored as html) and converting it to markdown that could be rendered by Jekyll. The first step was to write a bit of c# to dump each database post row into a file. Then I needed to convert the html to markdown; to do this I wrote a Node.js script based on the to-markdown package to convert the html archive which I’ve included below.
Its weird how technology sometimes circles back on itself, some of the very first websites I ever built were static html, and now in 2014 I’ve ditched server side code and databases in favour of static html again. I guess it goes to show that sometimes the simplest solutions are often the best.